The next phase of creating a new email job is defining the message of the email to be sent to the recipient list. LISTSERV
Maestro will copy content from a previously defined email job, or original content can be uploaded or entered as plain text, as HTML or a combination. Special “Drop-In Content” elements in the form of text, links, files, or a database can be added to the message. It is possible to include attachments to messages as well as select the language character set used to encode the message.
The Message Content Icon Bar makes it easier to define different aspects of your message, check which features are enabled, and check which features may require additional work. If a gray dash is displayed, then this features is disabled; if yellow circle arrows are displayed, then the feature requires your attention and is not complete; if a green checkmark is displayed, then the feature is enabled and all requirements are fulfilled.
You can now create professional-looking HTML message without any HTML coding. LISTSERV Maestro comes with ready-to-use message templates that contain placeholders that, when selected in the template designer, will let you fill in predefined areas with your own text or images. In addition, all text, including any changes you may make down the road, will be entered into both the HTML and the text part of your message so you only need to enter the text once. Each placeholder can represent one or several instances of plain text or HTML, or a linked or inline binary. When using the template designer, you can also preview each placeholder, providing a full picture of what the template will look like when it is finished.
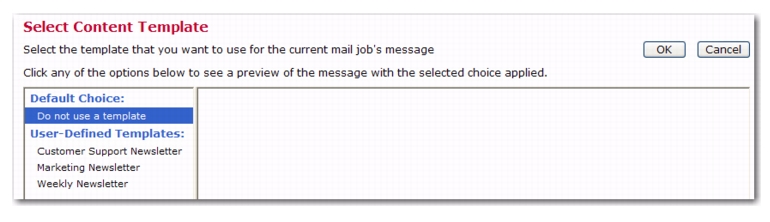
To use a message template for your email message, click on the Template icon at the top of the Define Message screen. Clicking this icon opens the Select Content Template screen.
Once you select a template, click [OK] to return to the Define Message screen and preview the template.
The biggest advantage to using an existing user-defined template is that the majority of the options and settings that need to be defined for a message are already complete, pre-defined by the person who designed the template. The only work left for you is to "fill in the blanks" that were left in the template in form of special template placeholders.
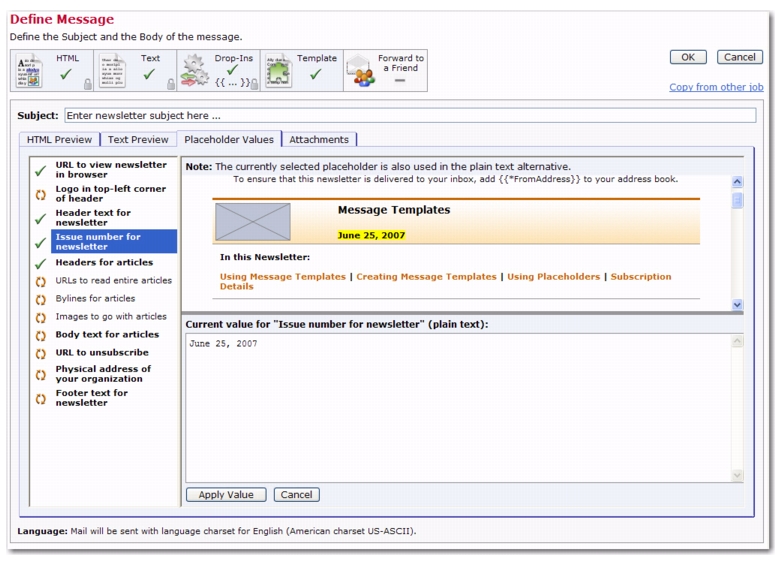
To fill out the placeholders, select the Placeholder Values tab. This tab displays a list of all placeholders in the template on the left and a preview of the message as it appears with the current placeholder values at the right.
In the placeholders lists, any placeholders with no value supplied are marked with the yellow circle arrows (these placeholders still require your attention). Placeholders where a value has already been supplied are marked with a green checkmark. The message as a whole will have the "complete" state only if all placeholders are supplied with a value and are marked with the green checkmark. In addition, any placeholders that are "mandatory" are shown with bold text, while "optional" placeholders are shown with normal text. A mandatory placeholder means that you must supply a non-empty value for this placeholder. For an optional placeholder, you may choose to leave the placeholder empty. However, you will have to do so actively (via the available links, see below), in order for the placeholder to be marked as complete (with the green checkmark).
The message preview pane to the right shows the current message with the current placeholder values already replaced. In the preview, the currently selected placeholder is marked with a highlighted background.
Any placeholders that are still undefined are shown with a suitable dummy text as a stand-in for the yet-to-be-defined actual value so that the preview is more meaningful.
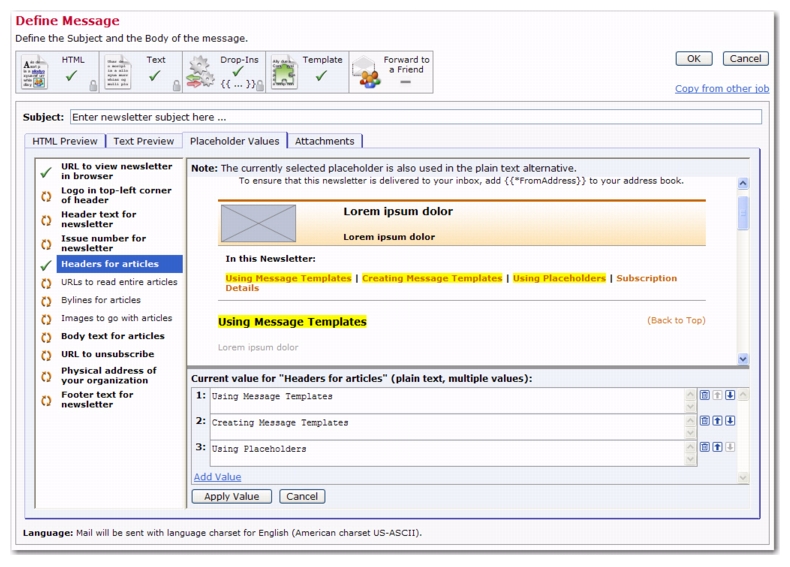
You can move the mouse pointer over the preview to see and select placeholders. When the mouse hovers over the value of a placeholder, the placeholder is highlighted and you can click it to select this placeholder.
Note: For an optional placeholder, an additional link with the text Leave Empty or Delete Value will also appear, that allows you to actively supply an empty value for this placeholder.
When you click the Edit link, you are able to edit the value for the placeholder. When editing a placeholder value, your options depend on the type of the placeholder.
|
•
|
Plain Text – The text that you type will be interpreted as plain text without any HTML code. If the placeholder is used in the HTML part of a message and the text you type contains any special HTML characters, then those will be HTML-escaped before replacement.
|
|
•
|
HTML – The text that you type will be interpreted as HTML code and may contain special HTML tags that are handled depending on the context.
|
If the placeholder appears in the HTML part of a message, then the HTML code appears unescaped and will be interpreted as normal HTML. This allows you to include HTML formatting code in the placeholder value (e.g. for attributes like underline, bold, color, font, etc.), but it also requires you to remember to manually escape any HTML-sensitive characters that are not be supposed to be interpreted as HTML code.
If the placeholder appears both in the HTML and the plain text part of a message, then each of the above applies for each respective part, i.e. in the HTML part the placeholder's value will be interpreted as HTML, in the plain text part it will automatically be converted to plain text. Therefore, it is, for example, safe to use simple formatting tags (like <b> or <u> for bold or underlined style) so that in the HTML part some special formatting will be applied, even if the same placeholder appears in the plain text part because there these tags will automatically be removed.
|
•
|
Binary – Placeholders of this type can only be used in the HTML part of a message. The value for such a placeholder will be a URL that points to a binary that is supposed to appear in the message. The kind of binary allowed for a given placeholder is usually made clear by the placeholder name and context. Usually, such binaries are images, but can also be background sounds. Depending on how the placeholder was defined, these choices may be available:
|
|
•
|
Upload an embedded inline binary – This option allows you to select a binary file from your local computer and upload it into the message definition. The binary file will be bundled together with the message (as a special inline attachment) and the placeholder will be replaced with a special URL that references this inline attachment. At the recipient's side, the binary will be viewable even if the recipient is offline or has loading of linked binaries disabled in the email client. However, this option makes the delivered email larger by the size of the binary.
|
|
•
|
Reference a linked binary – This option allows you to enter a URL. The binary from that URL will not be bundled with the message, but the URL will simply be used to replace the placeholder. At the recipient's side, the binary will then be loaded as a linked resource. The advantage is that the additional binary size will not be added to the delivered message, but the disadvantage is that the URL must be a publicly accessible URL and the binary can only be loaded if the recipient is online when reading the message and the loading of linked binaries has not been disabled.
|
|
•
|
Title input field – Depending on the placeholder definition, an input field for the Title attribute may be available. Usually the value of this field is used to supply the "title" and/or "alt" attribute of the <img> tag that renders the image that is defined by the binary placeholder. In these cases the "title" text will be displayed if the image should not be available (and also for accessibility purposes), and may also become visible as a tool-tip popup that appears when the mouse pointer is hovered over the image. This may vary, however, depending on the placeholder definition. Enter a meaningful "title" value for the binary that you provide.
|
|
•
|
Plain Text, multiple values – Similar to Plain Text (see above), only you have the option of supplying multiple values for this placeholder. These values will be combined into a list according to the template definition, and then used to replace the placeholder.
|
|
•
|
HTML, multiple values – Similar as HTML (see above), only you have the option of supplying multiple values for this placeholder. The multiple values will be combined into a list according to the template definition, and then used to replace the placeholder.
|
|
•
|
Binary, multiple values – Similar as Binary (see above), only you have the option of supplying multiple binaries for this placeholder. The multiple binaries will be combined into a list according to the template definition, and then used to replace the placeholder.
|
As described above, all values of a multi-value placeholder are usually combined together and the resulting value list is then used to replace the placeholder. As a result, if a template contains several multi-value placeholders after each other, then after replacement you will have several such lists: The first list contains all values of the first multi-value placeholder, followed by the second list with all values of the second multi-value placeholder, followed by the list of values from the third multi-value placeholder, and so on. Such as the following (assuming three multi-value placeholders with four values each):
However, in some cases, depending on the template definition, multi-value placeholders may behave differently. This is when several multi-value placeholders are grouped together by the template creator in such a way, that their values are being displayed in an alternating fashion, i.e. instead of all values of the first placeholder, followed by all values of the second placeholder, and so on, what you then get is something like this (assuming three grouped multi-value placeholders with four values each):
|
•
|
Use a matching order for the multiple values of the grouped multi-value placeholders, so that all the first values of all multi-value placeholders correspond to each other, just as all second values should correspond, and so on. Because as you can see from the above example, all the first values will be displayed one after the other, followed by all second values, then all third values, and so on.
|
The Forward-to-a-Friend feature lets you set up a “Forward this e-mail to a friend” link for each message you send to your list subscribers or message recipients. Once setup, this links gives your subscribers and recipients the freedom to share the message with others. Using this feature gives you the ability to reach a wider audience with your message and the ability to build your subscriber list using their friends as a referral.
Once the message is forwarded, an exact copy of the message will be delivered to all of the addresses supplied by the subscriber. Upon arrival, the message contains an additional preamble and personal message (optional) informing the new recipients who forwarded the message to them. The forwarded email will also contain the same "Forward this e-mail to a friend" link that was in the original mail, allowing the recipient to forward this message, yet again, to more friends.
Note: Privacy is preserved throughout the forwarding transaction, and every subsequent forwarding transaction.
If Forward-to-a-Friend tracking was enabled for the original message, then LISTSERV Maestro will also keep a record of all these forwards, with a detail level that corresponds to the selected tracking level. For information on enabling tracking, see Section 7
Tracking. For information on using the tracking report, see Section 12.6
Forward-to-a-Friend Report.
Notes: If the original message uses merge fields to fill in profile field values of the original recipient, then these fields will be freshly merged for each forward. This means that if the original recipient's profile fields have changed since the original mailing, then the forwarded message will contain different merge field values than the original message.
The forwarding will only work while the original Hosted Recipients List still exists and the original recipient is still a subscriber of that list.
The Forward-to-a-Friend feature can be enabled while you are defining the content of your email job. At the top of the Define Message screen, click
Forward to a Friend icon to open the “Forward to a Friend” Setting screen. This screen allows you to enable or disable the forward to a friend feature for your message. The screen is divided into several parts. The top part is where you enable the feature by simply clicking the
Enable “forward to a friend” for this job option. Once this option is enabled, the rest of the screen becomes active.
After enabling this feature, you will need to make sure that the conditions described on the screen are correctly met and the settings are configured accordingly. If a condition is not met, then the
Orange Circle icon appears next to it. When a condition is met, then the Green Shield with a
Checkmark icon appears next to it.
|
•
|
Recipients Type – Forward-to-a-Friend only works with recipients that are based on a target group that is based on a Hosted Recipient List. The feature does not work with any other recipient type.
|
|
•
|
Drop-Ins – Drop-in usage must be enabled for the message and the special system drop-in {{*ForwardToFriendURL}} must appear at least once in the message body. If the message has several body parts, like an HTML mail with a text alternative, then this special system drop-in must appear at least once in each body part. This system drop-in will later be replaced with a URL that, if clicked, will send the recipient to the special page where he can enter the e-mail addresses of his friends, to which he wants to forward the message. You should make sure that this system drop-in appears in a location where it can be easily found and understood by the recipient.
|
|
•
|
Forward to a Friend Preamble – Whenever a message is forwarded using the Forward-to-a-Friend feature, a special preamble is prefixed to the actual message, letting the recipient know that they are not the original recipient of this email, but that it has been forwarded by a friend. This is also important so that the recipient does not think that the email is spam. Because of this, the preamble is mandatory and can not be left empty.
|
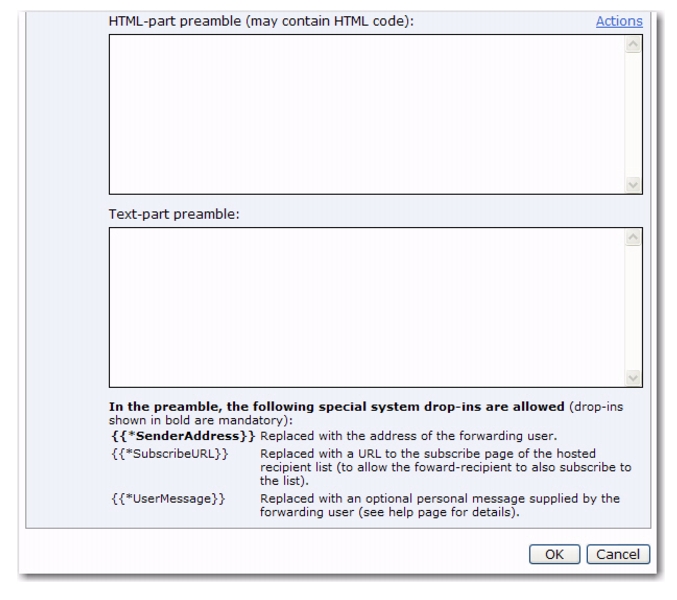
If the message is an HTML message with a text alternative, then two preambles must be entered – one for the HTML part (which may also contain HTML code) and one for the text alternative part.
|
•
|
{{*SenderAddress}} – The preamble must contain at least one occurrence of this special system drop-in, which will be replaced (during the forwarding process) with the email address of the recipient who triggered the forward. This drop-in lets the friend-recipient know who the message was from.
|
|
•
|
{{*UserMessage}} – This system drop-in allows for the addition of a personal message when forwarding the message. For more information, see the Allowing Recipients to Enter a Personal Message section.
|
Note: These three drop-ins, described above, are the only drop-ins that can be used in the preamble. In addition, these three special drop-ins can only be used in the preamble and cannot be used anywhere else in the body of the message.
The Actions link opens a menu with the following options:
|
•
|
Reset Preamble to Default – If you have previously saved your own default preamble (with the Save Current Preamble as Default option), then this option allows you to re-use this default for the current job. The preamble will be replaced with whatever preamble was last saved as your personal default.
|
|
•
|
Reset Preamble to System-Default – The preamble will be replaced with a system-defined default preamble. This option to reset to the system-default is always available.
|
Tip: Select this option, and then make changes to the default preamble as a shortcut to defining your own preamble. This will save you formatting time and provide you with an example of the usage of the system drop-ins.
The {{*UserMessage}} system drop-in in the preamble allows for the addition of a personal message supplied by the forwarding user. For this system drop-in, the following rules are used:
|
•
|
Any characters after "*UserMessage" and before "#VALUE#" will be part of the prefix, including all linebreaks (even linebreaks that appear immediately before "#VALUE#"), except for any whitespace that follows immediately after the word "*UserMessage" and that appears on the same line as the word "*UserMessage". This particular whitespace is ignored. Also, if the first line contains only whitespace after the word "*UserMessage", then the linebreak at the end of this line will also be ignored and will not be part of the prefix. (See below for examples.)
|
If the user does not supply a personal message, then the whole system drop-in (starting with the opening tag and ending with the closing tag) will be replaced with an empty string, i.e. the prefix and suffix will not appear.
If the user supplies a non-empty personal message, then the whole system drop-in (starting with the opening tag and ending with the closing tag) will be replaced with the text that is built by linking the prefix, user message, and suffix. Or, in other words, in the string "prefix#VALUE#suffix", the "#VALUE#" part (including the enclosing "#" characters) is replaced with the personal message, and the resulting string (including prefix and suffix) is used to replace the system drop-in.
Tip: For examples using the {{*UserMessage}} drop-in with prefix and/or suffix, see the online help.
The {{*SubscribeURL}} system drop-in in the preamble will be replaced with a URL of the subscribe page for the Hosted Recipient List (HRL) that was initially used in the recipient definition. You can use this URL to include a link in the preamble that allows the friend-recipient to also become a subscriber of the original list. If left out, then no such URL will be included in the preamble.
Notes: Only subscriptions that happen through a click on this URL in a forwarded message will be counted as "conversions" and reported in the forward-to-a-friend reports. In addition, The HRL and dataset must both be “open to everyone” in order for the {{*SubscribeURL}} system drop-in to function.
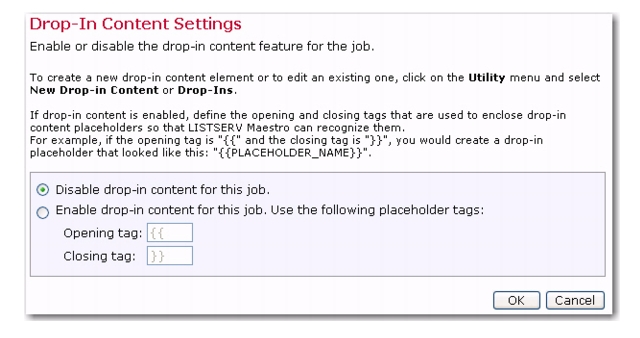
Drop-in content is similar to merging fields, except that the same content is merged into the email message for all recipients. Drop-ins can be used to create pre-defined content parts that can then be inserted into any message. For example, a drop-in content element could be created with a company header and added to all the outgoing email messages simply by including the name of the drop-in element in the content. For more information about creating drop-in content elements, see Section 15.3
Creating and Managing Drop-In Content Elements.
LISTSERV Maestro recognizes drop-in elements if they appear in the message enclosed by specially defined tags. The tags surround the name of the drop-in content element, creating a “drop-in placeholder.” This placeholder will be replaced by actual content at the time the message is sent. It is possible to see what the drop-in will look like within the context of the message by clicking any of the preview tabs, Text Preview, HTML Preview, or AOL Preview.
The default setting for drop-in content tags are double open and closed curly brackets, e.g. “{{“ and “}}”. An example of a drop-in content placeholder using the default settings would be {{
company_address}}. It is possible to change the open and closed tags to other characters, but the characters must not appear in the actual name of the drop-in content element itself or anywhere else in the text. For instance, if the name of the drop-in were "dec_header", then in the default mode the drop-in would appear as {{
dec_header}}. It would not be possible to change the open or closed tag to an underscore “_” because it appears in the name of the drop-in element. Conversely, if the actual message contains the text “{{“ or “}}”, then it will be necessary to select different tags to use for placeholders.
To include a drop-in content element in a message, simply type the drop-in element's name (with the exact spelling and case) and surround it with the opening and the closing tags that have been defined. For a list of available drop-ins, click the
Show Merge Fields and Drop-Ins link at the bottom of the text box on the HTML Code, AOL Code, or Text tabs. Copy and paste the name of the drop-in into the message to ensure the correct name and tags. To define a new drop-in content element, see Section 15.3
Creating and Managing Drop-In Content Elements.
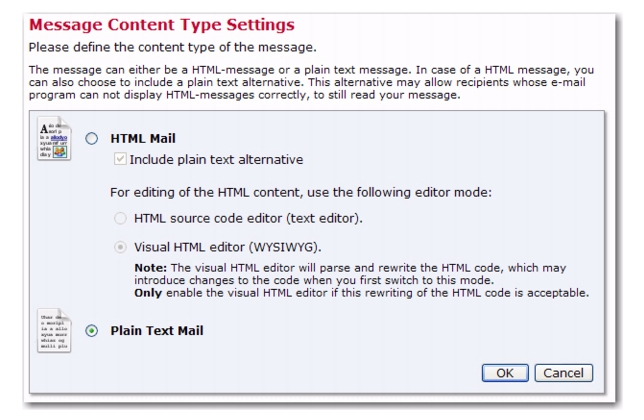
To create a plain text message with LISTSERV Maestro, select the
Text icon. The Message Content Type screen opens. Select the
Plain Text Mail option, and click
[OK] to return the Define Message screen.
On the Plain Text tab, type in the text box or click [Upload Plain Text] to upload a text file. If drop-in content has been enabled, the Plain Text Preview tab will appear. Click on this tab to see what the drop-in content elements look like within the body of the message.
Tip: Uploading a file composed in a word processing program can be beneficial because it is possible to use spelling and grammar checkers. Just be sure to save the file as text, not in the word processor format. Click
[OK] when finished composing or uploading the message.
Important: In order to track links inside of text messages, it is necessary to enclose the URL within quotation marks (“http://www.lsoft.com”). These quotation marks will be removed from the recipients’ copy of the message, and serve only to let the system know that there is a trackable link in the message.
Notes: The Plain Text Preview tab will use the same charset that is used when the mail is delivered. Because of this, any characters that will not be expressible during delivery will appear as a question mark (?) on the Plain Text Preview tab.
This feature only applies to the Plain Text Preview tab. The HTML part of a message will never contain unprintable characters because characters that are not contained in the selected charset will be included as HTML entities instead (such as, “&#NUMBER;”)
Note: In order for any links to be tracked in an HTML message, they must be enclosed within quotation marks. Most HTML editors will do this automatically, but it is possible to create a link without quotation marks that will be read in Internet Explorer (this browser is very forgiving of HTML coding errors). If in doubt, or if there is trouble selecting a tracking definition for a seemingly good link, double check the HTML coding of the links. An example of correct coding appears below:
<a href=”http://www.lsoft.com”>Link text goes here</a>
Omitting the quotation marks would result in incompatible coding for LISTSERV
Maestro tracking.
Important: In order to upload HTML files into LISTSERV
Maestro, it is necessary to have the Microsoft
® Java Virtual Machine (MS JVM) or Sun Microsystem’s
The Java Virtual Machine (JVMTM) installed. This ensures that any accompanying image files for backgrounds, banners, icons, diagrams, and pictures will be automatically uploaded with the source code. Most Windows systems manufactured before 2003 already have MS JVM installed. If a system does not, download The Java Virtual Machine from
http://java.sun.com/getjava/index.html.
Before creating the actual HTML message, you must enable it for HTML. On the Define Message screen, select the
HTML icon. The Message Content Type Settings screen opens.
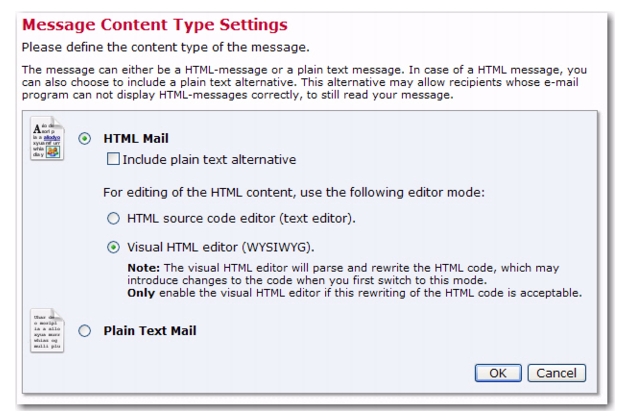
Select the HTM Mail option, and then select which editor mode you want to use for the HTML part (not available when using the Safari browser). To edit on the source code level, with a normal text editor, select
HTML source code editor. The advantage is that you have direct control over the HTML code; the disadvantage is the missing visual feedback of your input.
To edit using the new HTML Editor, which uses a visual editor in WYSIWYG-style, select Visual HTML Editor. The advantage is the direct visual feedback of your input; the disadvantage is that you have less control over the HTML code that is produced.
Important: To use the Visual HTML Editor, you must first enable it by selecting
Preferences,
Mail Jobs, then
Content. The Content Preferences screen opens. From here, select the
Use visual HTML editor option. If you want to enable the HTML Editor Toolbar, then select the
If visual HTML editor is used: Enable advanced toolbar for form elements option. For more information on user preferences, see Section 3
User Preferences.
Note: When you switch from the
source code editor to the
visual HTML editor, any existing source code will be parsed and rewritten by the visual editor, which may introduce changes to the code even if you do not make any changes yourself. Therefore, you should enable the
visual HTML editor mode only if it is acceptable to you that your HTML source code may be changed by the editor.
Click [OK] to return the Define Message screen.
If you selected HTML source code editor, then the HTML Code tab will be available. Use this tab to enter any source code for you message. You can type directly into the box, cut and paste HTML source code, or upload an HTML file. For information on uploading an HTML file, see Section 6.6.1
Uploading an HTML Message.
If you selected Visual HTML Editor, then the HTML Editor tab will be available.
Use this tab to access the HTML Editor, which lets you have visual feedback when creating you HTML message. If enabled, the HTML Editor Toolbar gives you many additional features, such as font and text formatting, cut, paste, undo, and redo actions, image insertion, table creation, and form fields. If you are used to using Microsoft Word as your HTML Editor, then you will certainly feel comfortable using the HTML Editor. You can also upload an HTML file from this tab. For information on uploading an HTML file, see Section 6.6.1
Uploading an HTML Message.
Note: To switch editing modes, click the
Editor Mode link on the HTML Code or HTML Editor tabs. This takes you back to the Message Content Type Settings screen (see Figure 6-9), which is where you can pick which editor to use.
|
1.
|
Click [Upload HTML] from the HTML Code, HTML Editor, or HTML Preview tabs on the Define Message screen.
|
|
2.
|
The first time a file is uploaded after the Java Virtual Machine is installed, a Security Warning screen will appear, asking for permission to use the L-Soft applet to upload HTML. If Always trust content from L-Soft Germany GmbH is checked, then the Security Warning screen will not re-appear for future uploads. If this option is not checked, then it will be necessary to grant permission to use the applet every time HTML files are uploaded in a new browser session.
|
The LISTSERV Maestro applet will also check to ensure internal and external references to linked or embedded image files are valid. Linked files are not sent with the message; embedded files are sent with the message. One advantage of using linked files is that the message will be smaller. However, a live Internet connection is necessary to view linked files. If the image server is down, they will not be visible. In addition, some firewalls strip HTML messages that contain links to outside sources thus rendering the image invisible.
Embedded files, on the other hand, will be visible without a live Internet connection and if the image server is down. They will make the message larger, but they will not, in most cases, be stripped from the message by a firewall. Consider the use of images, linked or embedded, carefully to avoid complications for the recipients.
Any invalid links will be counted as errors and will be reported in the Load Results dialog box. If
[Yes] is clicked, then LISTSERV Maestro will continue uploading the HTML file even if it contains link errors. The error report is only a warning to remind the user that there are currently problems, but the upload is
not suspended. The reason that uploads are not halted when the HTML contains errors is that the linked files simply may not be available yet. Sometimes, referenced web sites are under development or are being updated as the email message is being created. Once the linked site is complete, the message will be valid and can be sent out.
Tip: Make clicking each link for linked files a part of the testing procedure and don’t approve the test until all of the links are working correctly. For more information on testing an email job, see Section 9.1
Delivery Testing for a Job.
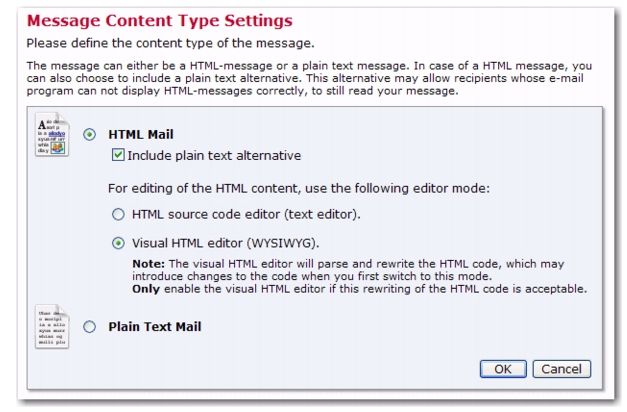
To add a plain text alternative to an HTML message, go to the Define Message screen, select the
HTML icon, select the
HTM Mail option, and then check the
Include plain text alternative box.
Selecting these options will ensure that recipients whose email client does not display HTML will default to the plain text alternative, allowing them to receive the message. Click
[OK] to return the Define Message screen.
On the Text tab, add the alternative text message. The message can be uploaded, pasted, or typed directly into the box. Use the Text Preview tab to see what the message looks like to recipients. Any drop-in content elements will be automatically added into the body of the text message.
Notes: Any trackable links in the alternative text message must be enclosed within quotation marks the same way as the trackable plain text message links are enclosed. Merge fields and drop-in content can be used in this format as described in Sections 6.4
Drop-In Content and 6.9
Merge Fields and Conditional Blocks.
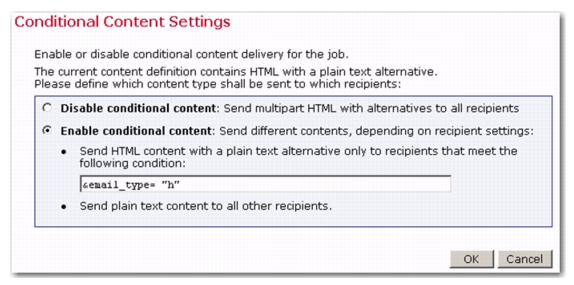
In the event that recipient data is available that somehow determines the format each recipient prefers to receive, then that data can be used to send the preferred format to each recipient, all within the same job. This determination is based upon a conditional statement run against the recipient data. The advantage of using conditional content is that it’s possible to prepare a single job for recipients who prefer HTML and those who prefer plain text, respecting each recipient’s choices as well as saving time and reducing the chance for errors while sending multiple jobs.
In order to use the Conditional Content feature, it must first be enabled. To enable Conditional Content, click on the
Change link that appears directly under the tabs of the text box on the Define Message screen when
HTML with text alternatives is selected. The Conditional Content Settings screen opens. Select
Enable conditional content.
Once enabled, it is necessary to type in the condition that determines which recipients receive which type of mail. LISTSERV Maestro uses the standard LISTSERV syntax to create the condition. See Section 17
Using Conditional Blocks or more information on constructing conditions. The condition needs to include at least one merge field from the recipient data so that the condition acts like a variable whose true/false result is different for those recipients receiving each of the different message formats.
In the HTML content with plain text alternative field, enter at least one condition for the HTML content. If a recipient fulfills the condition, the full HTML email
including the plain text alternative is delivered to that recipient. If the recipient does not fulfill the condition, a simple plain text email is delivered instead, containing only the plain text alternative. If attachments are present, then LISTSERV Maestro adds the attachments to each of the messages, without applying conditions.
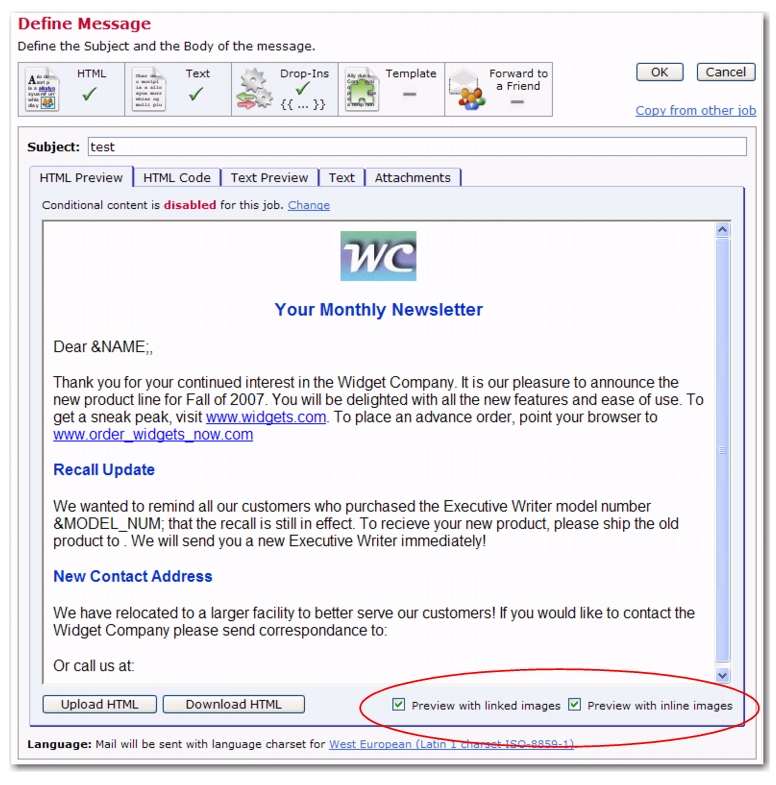
To preview your message and check whether or not your message is still discernible even if your images get blocked, go to the Define Message screen for your email job. This screen contains the new options,
Preview with linked images and
Preview with inline images, used for previewing your message’s HTML images.
Removing the checkmark from either of these options will have the effect that the corresponding image type will no longer be displayed in the preview, which lets you check how the message would look if this image type were blocked (or stripped) by the recipient's email client.
Notes: These options only work if these image types are present in the email message. In addition, these options only affect the preview of the message. The actual emails will always include the images (either linked or inline, depending on the type of each image) no matter how the options are set here on the HTML Preview tab.
There can be many reasons why images are not being displayed by an email client. For example, the email client could initially be blocking the display of linked images until the user manually unblocks them (this is very common with current email clients), or any inline image attachments may have been stripped from the email by the recipient's email server, or the mail client could simply be unable to display any images at all (as may be the case with older email clients). Because of these reasons, it is extremely important that you make sure your message is readable and understandable even if the images in the message are not being displayed. If your message is not discernible, then you should rework your text so that the message is apparent without the images.
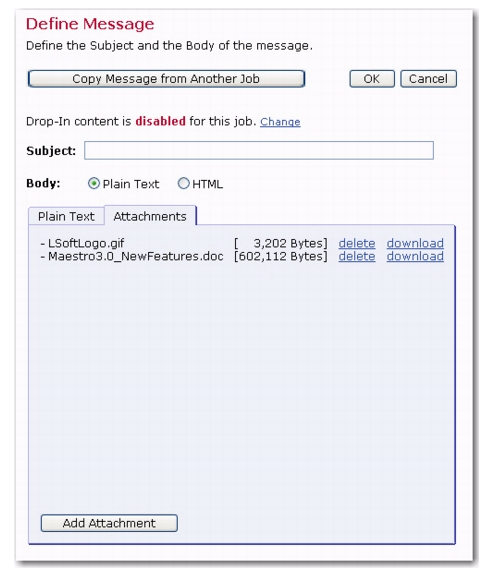
Click [Add Attachment] to browse for a file from a local drive. When content from one job is copied to another job, attachments are copied as part of the message content
To delete an attachment, click the delete link next that particular attachment. To download an attachment to a local drive, click the
download link.
Note: Any type of file can be included as an attachment to an email message. There is no limit to the number of files that can be attached to a message, but there may be a limit to the size of each attachment set by the system administrator. Large attachments or numerous attachments can slow down the delivery of the message and use up bandwidth. Recipients with slower connections may have a negative reaction to the message if they have to download large or numerous attachments. Consider using a link to the information instead of an attachment. That way, processing time is faster, less bandwidth is used, and the link can be tracked.
A character set (also called charset, character encoding, code page, or character page) is a table that matches numbers (the digital information sent by computers over the Internet) to letters, or more precisely, characters. Due to the nature of digital information and email (all data is reduced to numeric code) there is a finite number of “positions” in this table to correspond to letters and other symbols of a language. Therefore, different charsets have been developed to correspond to the different letters and symbols for different languages.
A charset will not translate one language to another; it only encodes data to match positions in the table to specific characters. For example, in the charset ISO-8859-1 (matching an alphabet suitable for West-European languages), the position number 196 represents the umlaut Ä. The same position, 196, using the charset ISO-8859-7 (the Greek alphabet), matches the Greek letter. As a result, the same position number in the table will result in different characters being displayed, depending on the charset used for the encoding. For more information on this subject, see Appendix B
Email and International Character Sets.
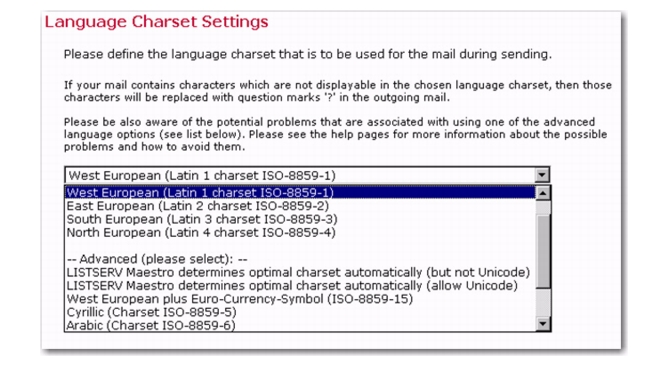
LISTSERV Maestro defaults to the ISO-8859-1 (Latin 1) character set for encoding email messages unless a different default setting has been preset by the system administrator. LISTSERV Maestro supports other charsets, and if users are given the right to use other character sets, an active link will appear at the end of the
Language: Mail will be sent with language charset for… sentence at the bottom of the Define Message screen. The link will be different depending on whether a different selection has previously been made. The default link is
West European (Latin 1 charset ISO-8859-1).
Tip: If LISTSERV Maestro is being used to send mail to recipients in a single language environment, either with plain English or with one of the common West European languages, the safest choice for a character set (charset) is always ISO-8859-1 (Latin 1) charset. It contains all 26 common alphabetic characters (both in upper and lower-case), all the common punctuation characters and the more common special characters like '@', '+', '*', and others. In addition, it contains the characters with diacritics required for many West European languages, such as 'ö', 'å', 'ç' and others.
It is not always necessary or possible to change the charset for email messages. Using other charsets can become quite complex, especially when merged data is involved. Each charset has advantages and disadvantages that are described in more detail in the online help and in Appendix B
Email and International Character Sets.
Notes: The Plain Text Preview tab will use the same charset that is used when the mail is delivered. Because of this, any characters that will not be expressible during delivery will appear as a question mark (?) on the Plain Text Preview tab.
This feature only applies to the Plain Text Preview tab. The HTML part of a message will never contain unprintable characters because characters that are not contained in the selected charset will be included as HTML entities instead (such as, “&#NUMBER;”)
LISTSERV provides the ability to customize mail messages for each recipient by merging in values uploaded with the recipient data or conditionally including blocks of text based on the preferences indicated in the recipient data. These values and preferences are taken from columns that are present in the recipient data.
To merge a field into the message, simply enter the field name (or header name) used in the recipient definition and precede it with an ampersand ("&") and follow it with a semi-colon (";"). If the recipients data is derived from a traditional LISTSERV list not connected to a database, then the only merge substitution fields available are &*TO; for the email address and &*NAME; for the name.
For a list of available merge fields, click the Show Merge Fields and Drop-Ins link at the bottom of the text box on the HTML Code, the AOL Code, or the Text tab of the Define Message screen.
The following example demonstrates how overdue book notices can be customized using specific recipient data in the form of the fields EMAIL, NAME, IDNUM, BRANCH, BOOK1, BOOK2, BOOK3. A text message merging the fields might look like this:
In an HTML message, the HTML Code would be altered to include the merge fields, being careful to respect the resulting HTML source code. In an HTML message with alternative text or alternative AOL, remember to put the merge fields in both the HTML Code and the alternative messages.
Conditional blocks act much the same way that merge fields do in that their use is dependent upon the recipient data available in the mail job. Well thought-out use of conditional blocks can also save time and resources by allowing one job to contain different content for different recipients that would otherwise have to be sent in multiple jobs.
Conditional blocks are sections of text that are inserted into a message based on a conditional statement. If the
condition is “true”, a particular section of text will be inserted into the message. If the condition is “false”, the text will not be inserted. An “ELSE” clause can be included as part of the conditional statement so a different section of text will be inserted into the message when the condition is “false”. For more information on coding conditional blocks, see Section 17 Using Conditional Blocks.
If conditional blocks are used in an HTML message, first create the basic HTML message, then go into the HTML Code and correctly insert the conditional statements, making sure to maintain proper HTML syntax once the directives are followed. The HTML Preview page will now look incorrect because the directives are interpreted as part of the HTML source code.
URL parameters are specially constructed parts of a web address (URL) that allow a single URL to initiate various specific operations by passing particular instructions and data to the web server. Parameters are text based instructions and data that are passed to a web server, which passes them on to a script (for example, a Java, Perl, C/C++, or a UNIX shell script). The script then executes the corresponding parameter as instructed by the URL, and passes the results back to the web server. The web server then returns the results to the client. In essence, parameters can be used to select a certain page or part of a page to display, or tell the server which page to display to a specific user or type of user.
A URL-parameter is a pair such as ”name=value” that appears after the path-part of the URL, separated from the path by a question mark “
?”, similar to the example below:
http://host.domain/path?param=value
http://host.domain/path?param1=value1¶m2=value2
|
•
|
Constant URL-parameters – Parameters that are the same for all URL visitors. A typical use of a constant parameter is to select a certain page, or part of a page. The following imaginary URL would tell the server to show the “electronics” page and the 15 th item on that page:
|
http://host.domain/path?page=electronics&item=15
|
•
|
Individual URL-parameters – Parameters that are different for each individual visitor. A typical use of an individual parameter is to tell the server about the identity of the visitor. The following imaginary URL would tell the server that the user with the ID “usr15” is visiting the page. The URL also contains a constant parameter that tells the server that it is supposed to show the “home” page:
|
http://host.domain/path?visitorID=usr15&page=home
http://host.domain/path?visitorID=usr217&page=home
LISTSERV Maestro allows the user to track URLs with or without parameters as well as URLs with constant or individual parameters. Since URLs with individual parameters need to have a different value for the parameter for each recipient, writing the text of the message could pose a significant challenge.
This challenge is overcome by using field merging, where it is possible, to create unique URL parameters based on the fields of a database. For example, assume there is a merge field named “
ID” for each recipient that contains the visitor ID of that recipient. The sample URL would be written as:
http://host.domain/path?visitorID=&ID;&page=home
http://host.domain/path?visitorID=&ID;&page=home
http://host.domain/path?visitorID=&ID;&page=home
http://host.domain/path?visitorID=&ID;&page=home
http://host.domain/path?visitorID=&ID;&page=home
http://host.domain/path?visitorID=&ID;&page=home
The second part of the first parameter “visitorID=&ID;” uses the LISTSERV Maestro convention of denoting mail merge fields. Its value is not an actual user ID, but instead is the name of the merge field “
ID”, with the preceding ampersand and the trailing semicolon (the format always used in LISTSERV Maestro to mark mail merge fields).
Although the ampersand usually has the reserved function of separating two parameters (like the second ampersand right before the “
page” parameter), when it appears to denote the merge field “
&ID;” it is acting as a token that will be replaced by the corresponding value of the recipient
before the mail is sent out. Therefore, this string will not be present in the final email that appears to the recipient. Instead, it will have been replaced by the merge value for that recipient.
If the URL from above were sent to two recipients, where one recipient has an ID merge value of “usr15” and the other has a value of “usr317”, each would receive an email message with
different URLs, like this:
http://host.domain/path?visitorID=usr15&page=home
http://host.domain/path?visitorID=usr317&page=home
By employing LISTSERV Maestro’s mail merging features, it is possible to insert URLs that contain constant and individual parameters for each recipient into email messages. If these URLs are marked for tracking, then LISTSERV Maestro is able to track all of them. As a result, if a URL that contains a merged parameter is selected for tracking, LISTSERV Maestro will count all clicks of all recipients on this URL, and each recipient will be directed to the actual URL using his or her own individual parameter.
http://host.domain/path?visitorID=&ID;&page=home
In the email messages that are sent out, the URL is replaced by a special tracking URL that points to the server running the Maestro Tracker component. This allows LISTSERV Maestro to count each click on the URL and then redirect to the actual target URL. The user with the ID “usr15” would have the URL in the mail that looks something like this:
Each user that clicks on this tracking URL will be counted and will be redirected to the actual target URL, using the URL-parameters for that user. For example, the server at “
host.domain” will receive the correct “
visitorID=usr15” and “
page=home” parameters (for other recipients, the “
visitorID” would have different values).
URL-parameters may only contain characters that are safe to use in a URL. Some characters are not safe to use, other characters have a reserved meaning (for example, the ampersand “&”, which has the special meaning of separating two parameters). Therefore, all characters that are not valid for use in a URL parameter value must be “URL-encoded”. URL encoding is a standard that encodes unsafe characters into safe characters.
|
•
|
Make sure that the values of all merge fields that are used (of all recipients) are actually URL-safe. For example, if all recipient IDs only contain alphanumeric characters, then the ID values are already URL-safe because alphanumeric characters are, by definition, URL-safe. It is important to know how recipient IDs are generated by a registration script, for example, in order to know if they are indeed URL-safe.
|
|
•
|
If the possibility exists that not all merge values are URL safe, then use the special LISTSERV function “ &*URLENCODE()” to make them so. Simply enclose the merge field in the URL within the parenthesis of this function. For example, if there were any doubt that the ID merge field’s values were URL safe, then the sample URL could be written like this:
|
http://host.domain/path?visitorID=&*URLENCODE(&ID;)&page=home
The function “&*URLENCODE(&ID;)” tells LISTSERV to retrieve the value of the “
&ID;” merge field, apply the “
&*URLENCODE()” function to it, and then merge in the result in place of the whole “
&*URLENCODE(&ID;)” string.
Important: The parameter name “ref” is a reserved name that is used by LISTSERV Maestro to transfer the tracking information to the Maestro Tracker component (seen in the example above). Therefore, “ref” cannot be used in any parameters if there are also merge fields in the same URL. If a URL appeared as:
http://host.domain/path?ref=&ID;
http://maestro.domain/trk/click?ref=z4bx39x&ref=usr15
This URL contains two parameters with the name “ref”. One comes from the original URL, while LISTSERV Maestro added the other. These two parameters with the same name would confuse the Maestro Tracker component. Therefore, a parameter called “
ref” must never be used if there are merge fields used in the URL.
If merge fields are not being used in the parameter list of the URL, then LISTSERV Maestro replaces the whole URL with the tracking URL, including the parameters. For example, the following URL with three constant parameters (no merge fields used):
http://maestro.domain/trk/click?ref=z4bx39x&
Since the parameters are also replaced by the tracking URL, it does not matter if the parameter list contains a parameter called “
ref” or not. However, this is only true if no merge field is used in the parameter list, meaning that there are only constant parameters.
If the LISTSERV list archive is enabled for a LISTSERV list, then postings to this list may also be read in form of a RSS feed (in contrast to subscribing to the list and receiving the messages via email). RSS feed readers usually display a short abstract for each message in the feed, which allows the user to determine if he/she is interested in reading the full message.
If the current recipient definition of the mail job is set to Send to an Existing LISTSERV List with the
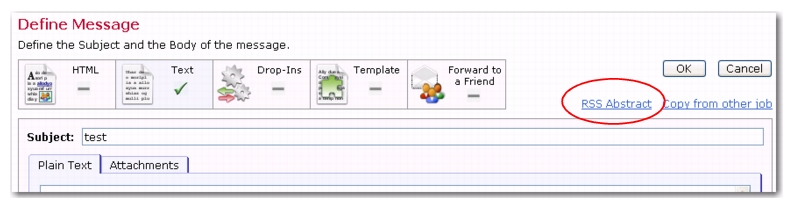
Send job as a standard list message to list members option, then the RSS abstract definition will be available on the Define Message screen.
To define the RSS abstract, click the RSS Abstract link. The RSS Abstract screen open. From here, you can define the abstract that will be used for your message, in case your message is read via a RSS feed.
The message you enter must be plain text only and should be a short and concise overview about the full message content. In addition, you should not rely on text formatting like indentations or linebreaks, as RSS feed readers may not display these correctly.
Click [OK] to submit your message or
[Cancel] to return to the Define Message screen without submitting any changes.
The abstract will be added to the message in the form of a special attachment that is of the "text" type and that uses the filename "abstract.txt". This attachment will be recognized by LISTSERV when the message is posted to the list, and LISTSERV will retrieve the text from the attachment and use it as the RSS abstract for the submitted message.
Notes: This attachment will also be visible to all subscribers of the list who receive the message as a normal email. In this case, the attachment will be displayed in the same manner as the recipient's email client usually displays attachments, and the recipient may chose to open and read the content of this attachment. Therefore, when writing the abstract, you should remember that both RSS feed readers and normal subscribers may read this text.